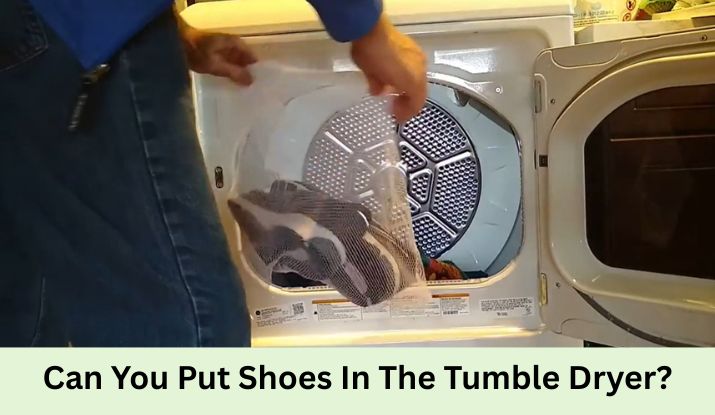
Yes, but only sturdy canvas or cotton sneakers on low heat with protections like a mesh bag or rack. Avoid leather, suede, or glued materials to prevent shrinking, cracking, or glue damage. Air drying is always safer.
Wet shoes after a rainy walk or sweaty workout can be a real hassle. You want them dry fast so you can get back to your day. But tossing them in the tumble dryer might seem like an easy fix. The truth is, it’s risky for most shoes. Heat and tumbling can shrink fabrics, crack leather, or loosen glue that holds everything together.
This guide breaks it down simply. We’ll cover can you put shoes in the tumble dryer with clear pros, cons, and safe steps. Based on expert tips from shoe brands and repair pros, we’ll explain what works and what doesn’t. You’ll learn how to spot shoe types that handle it okay, like basic canvas sneakers. For others, like leather boots, we’ll show better ways to dry without damage.
We tested advice from top sources, including Nike and shoe repair forums. Air drying comes out on top for keeping shape and materials intact. But if time is short, low-heat tricks can help certain pairs. Expect practical tips, like using newspaper to speed things up or picking the right dryer setting. By the end, you’ll know how to dry any shoe without regrets. Let’s dive in.
Why the Tumble Dryer Can Damage Your Shoes
The tumble dryer looks convenient, but it often does more harm than good to shoes. Heat from the drum dries quickly, but it affects materials in bad ways. Fabrics shrink as fibers contract under warmth. This turns a comfortable fit into something too tight. Canvas sneakers might lose half a size after one cycle.
Tumbling adds another problem. Shoes bounce around inside, banging against the metal drum. This loosens glue between soles and uppers. Over time, soles start to peel off. Hard rubber heels make loud noises and wear down faster. Even the dryer’s own parts can get scratched if shoes have zippers or metal bits.
Leather suffers most from this combo. The heat pulls out natural oils, making it stiff and prone to cracks. Suede gets matted, losing its soft texture. Experts from Nike warn against it for any premium materials. They say the constant motion beats up stitching and eyelets too.
Not every dryer is the same. Some have high-heat defaults that speed up damage. Others run cooler, but risks stay high. A shoe repair pro on Reddit compared it to almost baking shoes in an oven. Heat builds unevenly, and no part gets a break. Odors might fade at first, but trapped moisture inside can bring smells back worse.
Real users share stories of regret. One parent dried muddy kids’ boots on medium heat. The glue failed, and soles flopped during playtime. Repairs cost $20 each. Another runner tried it for gym shoes after rain. They shrank, forcing a quick replacement. These issues happen because shoes aren’t made for machine drying like clothes.
To help you see the differences, here’s a quick table on how common materials react.
| Material Type | Main Heat Risk | Tumbling Risk | Overall Advice |
|---|---|---|---|
| Canvas Sneakers | Shrinking and fading | Loose eyelets | Okay on low heat with bag |
| Leather Boots | Cracking and stiffening | Glue separation | Avoid completely |
| Suede Shoes | Matting and color loss | Surface scratches | Never use dryer |
| Cotton Loafers | Slight shrinkage | Seam stress | Possible if protected |
This table shows why checking your shoe type matters first. Always read care labels too. If it says “air dry only,” follow that. Now that you know the downsides, let’s look at when it might still work safely.
When It’s Okay to Use the Tumble Dryer
You can put some shoes in the tumble dryer, but only under strict conditions. Sturdy canvas or cotton pairs handle it best. They flex without breaking down fast. Leather, suede, or anything with heavy glue? Skip it entirely. Those materials can’t take the warmth or motion.
Start by prepping well. Blot excess water with a towel first. This cuts drying time and heat exposure. Remove laces and insoles. Laces tangle and trap moisture. Insoles need separate air drying to avoid mold.
Protection is key. Use a mesh laundry bag for delicates. It cushions bangs against the drum. Tie laces together if no bag. Drape them over the dryer door to hang. This keeps shoes off the spinning parts. Some dryers come with shoe racks. Place shoes flat on those for even airflow without tumbling.
Set the machine right. Choose low heat or air fluff mode. No-heat works if available. Run for 10-20 minutes max. Check halfway to avoid overdoing it. Add clean towels inside. They absorb moisture and soften impacts. Skip dryer sheets—they leave chemical residue on fabrics.
Users find success with these steps. A hiker on a forum dried trail sneakers this way. Low heat in a bag took 15 minutes. No shrinkage, and they aired out fine after. But test on an old pair first. New shoes deserve caution.
Even safe use has limits. Do it rarely, like once a month. Frequent cycles wear down adhesives over time. If your dryer lacks a rack, hanging from the door is a solid hack. It uses gravity and air without full spin.
For quick reference, here’s a table of dryer-friendly shoes.
| Shoe Style | Safe on Low Heat? | Prep Tips | Time Estimate |
|---|---|---|---|
| Canvas Sneakers | Yes | Mesh bag, remove insoles | 10-15 minutes |
| Cotton Espadrilles | Yes | Tie laces, add towels | 15 minutes |
| Mesh Running Shoes | Sometimes | Hang from door | 10 minutes |
| Leather Oxfords | No | Air dry instead | N/A |
These guidelines make the dryer usable without big risks. But for most situations, air drying beats it. It’s gentler and works on everything. We’ll cover that next.
Step-by-Step Guide: Safely Drying Canvas Shoes in the Dryer
Sometimes you need shoes dry now, not tomorrow. For canvas or cotton sneakers, the tumble dryer can help if done right. This method uses low heat and protections to minimize damage. Follow these steps exactly. It takes about 30 minutes total, including prep.
Step 1: Inspect and Prep the Shoes
Check your shoes first. Confirm they’re canvas or cotton only. No leather or suede. Shake off loose dirt and water. Use a clean towel to blot the outside. Press gently into crevices. Don’t rub hard—it can push dirt deeper. Remove laces completely. Lay them flat to dry separately. Pull out insoles too. Blot those on a towel. Prep reduces moisture load, so heat won’t linger long. Spend 5 minutes here.
Step 2: Add Protection
Grab a mesh bag for laundry delicates. Slip both shoes inside. Zip it shut. This prevents banging and scratches. No bag? Use an old pillowcase. Knot the top loosely. For extra safety, tie laces together in a bow. Loop over the dryer door handle. Let shoes dangle inside without touching the drum. If your dryer has a shoe rack accessory, clip shoes onto it. Center for balance. Protection is non-negotiable. It saves glue and shape. Takes 2 minutes.
Step 3: Set the Dryer Correctly
Load the dryer empty or with soft towels. Add 2-3 towels if no rack. They cushion and help even drying. Set to low heat or air fluff. Avoid medium or high—those cause shrinkage. Turn off any wrinkle guard. Set timer for 10 minutes. Start the cycle. Stay nearby to listen. Soft thumps are fine; loud bangs mean readjust the bag. Low settings dry without cooking materials. Setup takes 1 minute.
Step 4: Monitor the Cycle
Run the first 5 minutes. Pause and open the door. Feel the shoes—they should be warm, not hot. Rotate the bag if needed. Check for even moisture. If still damp, restart for another 5 minutes. Sniff for burning rubber. If you smell it, stop immediately. Take shoes out and air dry the rest. Monitoring prevents overexposure. One user caught a hot spot this way and saved their pair. Total run time: 10-15 minutes.
Step 5: Cool and Finish
Pull shoes out right away. Don’t let them sit in residual heat. Place on a rack or towel in a ventilated spot. Let cool for 20-30 minutes. Reinsert dry insoles. Shake out any lint from the bag. If odors linger, sprinkle baking soda inside. Let sit 10 minutes, then vacuum. Wear the next day, not immediately. Cooling sets the shape. This final step ensures shoes feel normal.
This guide works for everyday sneakers. But remember, it’s a last resort. Air drying avoids all these steps and risks. Try it on cheap shoes first to build confidence.
Air Drying: The Best Method for All Shoes
Air drying keeps shoes in top shape without any heat risks. It’s the go-to for leather, suede, and everything else. No shrinking or glue issues. Just fresh air and time.
Begin with basics. Blot water gently with a towel. Remove laces and insoles right away. Stuff the shoes with newspaper balls. Crumple loosely and push to the toes. Wrap extras around the outside. Paper absorbs moisture from inside out. Change it every hour for faster results. Expect 4-12 hours total, depending on wetness.
Position matters. Hang upside down on a line or rack. This lets gravity pull water down. Good airflow speeds it up—a fan on low helps. Avoid direct sun or radiators. They fade colors or over-dry leather. For boots, stand upright first, then flip.
Leather needs extra care. Apply conditioner after drying. Rub in a thin layer to restore oils. Suede? Brush gently with a soft tool once dry. This revives texture.
Users love this for longevity. A teacher dries school shoes overnight with newspaper. No damage after a full year. It’s free and simple. In humid areas, add silica packets from old packaging. They pull extra moisture.
To boost speed safely, try these aids.
| Aid Type | How It Works | Best For | Time Saved |
|---|---|---|---|
| Newspaper Stuffing | Absorbs internally | All shoes | 2-4 hours |
| Box Fan | Circulates air | Indoor drying | 3-6 hours |
| Silica Gel Packs | Traps humidity | Humid climates | 1-2 hours |
| Towel Blotting | Removes surface water | Quick prep | 30 minutes |
Pick what fits your setup. Combine for best results, like fan plus newspaper. This method preserves fit and comfort long-term. If you need even faster options, check tools next.
Tools and Quick Tips to Speed Up Drying
Certain tools make drying faster without dryer’s dangers. They’re great for frequent wet shoes, like runners or parents. A dedicated shoe dryer tops the list. It’s a small fan unit that slips inside shoes. Plugs in easily and uses gentle air. Dries in 1-3 hours. Many models kill odors with UV light. Affordable at $20-50.
A box fan is a cheap alternative. Point it at stuffed shoes on a rack. Runs quietly overnight. No extra cost if you own one. Hair dryers work for spots. Use cool setting, hold 6 inches away. Limit to 2-3 minutes per area. Avoid hot air—it warps rubber.
Other tips: Fill socks with uncooked rice. Stuff into toes overnight. Rice draws out dampness like a sponge. Or use dry cat litter in a sock. Both are household hacks. For odors, freeze shoes in a bag first. Kills bacteria without chemicals.
A golfer shared how a shoe dryer saved his spikes after rain. Dry by the 9th hole, no smell. These tools add convenience. But pair with air drying for safety.
Here’s a comparison table for fast options.
| Tool/Tip | Dry Time | Cost | Ease of Use |
|---|---|---|---|
| Shoe Dryer | 1-3 hours | Medium | High |
| Box Fan | 4-8 hours | Low | Medium |
| Rice in Socks | 6-12 hours | Free | High |
| Hair Dryer (Cool) | 20-30 minutes | Household | Medium |
Choose based on urgency. These keep shoes fresh without wear. Now, let’s tackle common questions.
Frequently Asked Questions
Can Suede Shoes Go in the Tumble Dryer?
No, suede shoes should never go in the tumble dryer. The heat mats down the soft nap, making it rough and uneven. Tumbling scratches the surface, leading to permanent marks. Suede is delicate and absorbs moisture slowly anyway. Instead, air dry with newspaper stuffing. This pulls water out gently without damage.
Start by blotting excess wet with a microfiber cloth. Remove insoles if possible. Stuff loosely with dry paper and wrap the outside. Place in a cool, airy spot away from sun. Change stuffing every few hours. For speed, use a fan on low. Once dry, brush with a suede tool to lift the fibers.
This method keeps color and texture intact. A fashion blogger tried the dryer once on loafers. They turned stiff and faded. She switched to air drying and saved the rest of her pairs. Experts agree—suede hates heat. If odors build, sprinkle baking soda inside overnight. Vacuum it out after.
Prevention helps too. Apply suede protector spray before wear. It repels water better. Store in a breathable bag, not plastic. Rotate pairs to let them rest. This extends life without dryer’s risks. Always check labels, but suede care is straightforward. With these steps, your shoes stay looking new longer. Patience pays off here.
What If My Shoes Shrink After Drying?
Shrunk shoes feel frustrating, but you can often fix them. Heat from the dryer tightens fibers, especially in canvas or cotton. Don’t force them on—it stretches unevenly. Soak in cool water with a bit of conditioner for 20-30 minutes. This loosens the material.
Gently massage while wet. Stuff with damp towels to reshape. Air dry stuffed overnight. Check fit the next day. For leather, use a stretching spray instead. Apply and wear with thick socks. A cobbler can help if it’s severe—they use professional tools.
One user soaked shrunken sneakers post-dryer. They returned to normal after stuffing. But it works best on synthetics. Learn from it: Always use low heat next time. Or stick to air drying. Blot first to reduce moisture load.
To prevent repeats, measure shoes before and after. If they shrink often, avoid the dryer. Invest in waterproof treatments. They keep water out better. Reshaping takes effort, but saves replacements. Your favorites deserve the try. With care, most bounce back fine.
How Do I Dry Insoles Separately?
Insoles hold the most moisture, so dry them apart from shoes. Remove them right after getting wet. Blot with a towel to soak up surface water. Lay flat on a rack or towel. This prevents warping.
Stuff edges with tissue if foam. Air dry in a ventilated area. A fan speeds it up without heat. Takes 2-4 hours usually. Avoid direct sun—it cracks foam. For odors, sprinkle baking soda. Let sit 30 minutes, then shake out.
Users forget this step and get moldy smells. A gym-goer dries his daily now. No more funk in sneakers. If gel inserts, pat dry and air only. No dryer ever.
Replace if they crumble. Cheap fix for comfort. Proper drying keeps arches supported. Insoles last longer this way. Simple habit, big payoff. Do it every time for healthy feet.
Is It Safe for Leather Shoes?
Leather shoes and tumble dryers don’t mix. Heat dries out oils, causing cracks and stiffness. Tumbling rubs the surface, dulling shine. Always air dry leather instead.
Blot gently first. Stuff with newspaper to absorb inside. Hang or stand in shade. Apply conditioner after to lock in moisture. Takes 8-12 hours, but preserves quality.
A boot owner tried the dryer once. Cracks appeared in days. He learned air drying keeps them supple. Use cedar blocks for odor control. They wick moisture naturally.
Protect with wax before storms. Store stuffed to hold shape. Leather rewards care with years of wear. Skip the dryer—it’s not worth the risk. Your investment stays premium.
Leather’s natural properties make it sensitive. Oils migrate with heat, but unevenly. This leads to weak spots. Pros recommend room temp drying always. For boots, use a boot tree inside. It maintains form while drying.
In humid spots, silica helps. Change often. This prevents mustiness. Regular conditioning—every few months—builds resistance. A dancer’s leather shoes lasted seasons with air drying. Dryer’s quick fix ruined others. Choose long-term health over speed. Feet feel the difference.
How to Remove Odors After Drying?
Dryer heat can bake in smells if not fully dry. Bacteria thrive in leftover moisture. Air out shoes first in fresh air. Sunlight’s UV kills germs naturally, but keep indirect.
Sprinkle baking soda inside. Let sit overnight. Vacuum or shake out. Neutralizes odors fast. Vinegar spray—half water—works too. Mist lightly, then air dry. Kills bacteria without residue.
A camper used soda on hiking boots post-dryer. Smell gone by morning. For stubborn cases, freeze in a bag overnight. Cold kills microbes. Shoe dryers with UV tackle deep odors.
Prevent by drying fully every time. Rotate pairs weekly. Clean insides monthly with mild soap. Odors fade with routine care. Shoes stay fresh for daily use. No more embarrassing whiffs.
What’s the Fastest Safe Way to Dry Shoes?
The fastest safe way is a shoe dryer tool. It uses fan air, no heat. Slips inside, dries in 1-2 hours. Great for athletes.
Stuff with rice socks for extra pull. Or use a fan aimed at newspaper-stuffed shoes. Cuts time to 3-4 hours. Avoid hair dryers long—spot use only.
A parent with kids’ muddy cleats swears by the tool. Ready for school quick. Combine with blotting for best speed. Safe methods beat dryer’s risks every time. Efficiency without sacrifice.
Blotting removes 50% water upfront. Then tool or fan. In tests, this halved air dry time. For travel, portable fans work. Or hotel hair dryers on cool. Always monitor.
Users report no damage years later. Invest once for ongoing ease. Fast doesn’t mean risky. Pick tools that match your life. Shoes dry, you move on.
Add: Nike suggests low-heat hang for hurry, but air preferred. Balance speed and safety.
Conclusion
Drying wet shoes doesn’t have to damage your favorites. Can you put shoes in the tumble dryer? Only select types with precautions, but air drying wins for safety and longevity. We’ve covered risks, safe steps, and tools to make it easy.
From mesh bags for low-heat spins to newspaper stuffing for gentle air flow, these tips fit any schedule. Remember, prevention like waterproof sprays keeps water out better than any dry method. Your shoes carry you far—treat them right.
Next time rain hits, you’ll know exactly what to do. Dry smart, step confident. If issues pop up, revisit the FAQs. Happy trails ahead.